• Welcome to ZD Forums! You must create an account and log in to see and participate in the Shoutbox chat on this main index page.

Cooks Corner - Aspiring Chefs and Starving College Kids LOOK HERE!

Joined
Sep 16, 2009
Location
Cali For Nuh
So, welcome to the Cook's Corner, a place to share and post recipes, that you would like to share with your fellow friends.

I'll start with one of my favorites


----------------
Beef Stroganoff
----------------

Pasta

1lb of Ground Beef
1/4 cup of onion
1tbs Powdered garlic
1 can of cream of chicken


Boil the pasta and set aside.

In a skillet, brown ground beef, with onion and glarlic, when fully cooked, drain excess fat and pour in can of soup. Stir occasionally for 15 minutes.

Serve Stronganoff over pasta.

(For a more healthier meal, substitute regular pasta for whole-wheat, and use Ground Turkey instead of ground beef)
 

DisappearingMist

Mrs. Caleb
Joined
Aug 20, 2008
Location
Alaska
Just made a non hamburger tater tot casserole tonight.


Tater Tots
Cream of Mushroom soup - I used 3 cans, but 2 might be enough
Cheddar Cheese, shredded

I put in a can of green beans, some carrots and a can of corn, then mixed those three up with the soup, and put in a baking dish. I shredded the cheese over the top, and finally put one layer of tater tots on the top. Bake at 350F degrees for 30-40 minutes.


I am eating it as I type this, and it is tasty :)
 

TheGreen

is climbin' in yo windows
Joined
Jul 12, 2010
Location
San Antonio
Oh cool thread.
I will be moving into my first (quasi)apartment in a couple of weeks. I'm sure frozen food will get old pretty quick so I'll be checking back here frequently!
*resisting overused Ramen stereotypes*
 

February Eve

ZD District Attorney
Joined
Mar 21, 2010
Location
USA
I love cooking. This is a long post (for me.)

To start with, technically not "cooking", but food related - I've been on a smoothie kick for breakfast. It's very hot where I live right now and it's a nice start to the day.

----
Smoothies
----

You need:

-A blender
- 1 single serving container of vanilla yogurt (or any other flavors, depending on what you are making)
- Milk
- Frozen fruit
- Frozen whipped cream
- Vanilla flavoring
- powdered milk
- depending on the smoothie, honey

Though the last three/four are entirely optional. I'm going to use strawberries as my example since that's what I've been making lately.

Add yogurt, frozen strawberries, and enough milk to blend the strawberries - I don't cover them with milk because I like my smoothies thick, but I add enough so that the blender runs smoothly. You can always add a touch more if you're having trouble blending them. I also add a spoonful of whipped cream for creaminess and a very small amount of vanilla flavoring (probably 1/8 of a teaspoon.) You can add a couple shakes of powdered milk for extra calcium if you'd like. And when I am making a peach or mixed fruit smoothie (same ingredients except I leave out the vanilla flavoring), I sometimes add a squirt of honey for sweetness.

The good thing about smoothies is I use skim/lite ingredients for all the dairy and it still tastes lovely. It's also easy to improvise (but remember, it's easier to add more than to fix something you added too much of.)

Now for actual cooking. A quick and easy breakfast/snack.
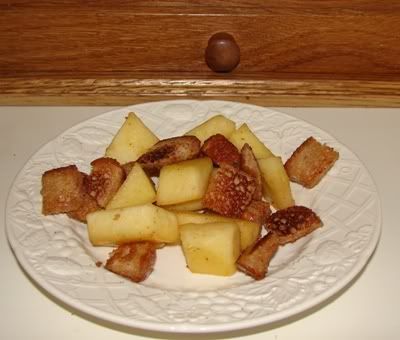
----
Apples and Toast
----

You need:

- toaster
- stove
- an apple
- bread
- butter
- brown sugar
- Cinnamon


Melt butter in a frying pan (the burner only needs to be on medium heat). I cut up the apples into chunks while it is melting - if you cut it up before, though, just get a small bowl of water with some lemon juice squirted in the water. Putting the cut apple in the lemon water will prevent it from browning. Of course, drain the bowl before adding the apple to the frying pan.

Cook the apple in the butter, stirring often so that it doesn't burn. When the apple is fairly tender add half a tablespoon of brown sugar and stir until the apple is coated (stirring even more frequently, as sugar will scorch easily.) Also add a dash of cinnamon. While it is cooking, make two slices of toast. When it is toasted to your satisfaction, cut it into pieces.

When the apples are done, take it off the burner and add the pieces of toast. Stir them in and they will soak up the extra butter, sugar, and cinnamon. Then it's done!

applesandtoast.jpg


(Hopefully that looks appealing, but if not, it's better than it looks.)

When I cook lunches/dinner, I usually make soup so that I can carry the leftovers to work in a thermos. But for something fun, pizza biscuits. It's also very easy to make if you are an inexperienced cook.
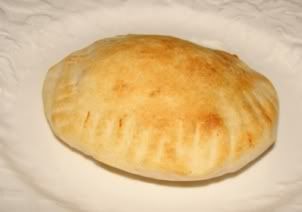
----
Pizza Biscuits
----

You need:

- 1 canister regular size (not jumbo) refrigerator biscuits (I usually use 10-count buttermilk)
- Some kind of pizza sauce (homemade or store-bought)
- Cheese, if you want it
- Some kind of "topping" (pepperoni, ham, etc)
- Probably some kind of oil (I use olive or canola)
- A baking sheet
- Access to an oven

Pop open the refrigerator biscuits. Separate them and roll out half of them so that they are like flat, very small pizzas. You may need to add some oil to the biscuit or your hands first to make it roll out easier. Once you do, add a small amount of pizza sauce, cheese, and whatever toppings you want to the center of the biscuit. You don't need a lot because your next step will be to roll out the rest of the biscuits and layer them on top of the others, so that your filling is covered. Your top biscuit, therefore, will need to be at least the same size as the bottom one, but maybe bigger. Mesh the sides together (you can use a fork to make "pleats".)

They only have to cook in an oven for about 10 minutes or so at 400 degrees Fahrenheit. It's easy to tell when they are done because the top part turns golden. I have made some very pretty biscuits but also some where I put too much filling in them and it spilled out the side while cooking. So no worries if it looks covered with red sauce instead - it's delicious either way. :p

pizza.jpg
 
Joined
Sep 16, 2009
Location
Cali For Nuh

I'm drooling now.

this one's a baked chicken recipe.

------------------------
What You Need
-----------------------

- Breadcrumbs (make your own using a food processor and a piece of bred or buy pre-bought crumbs) (I perfer italian herbs in my prebought, but those can just as easily be added to fresh bread crumb mixture)

- Parmesan cheese (the kind that comes in the kraft type container, not the freshly shredded stuff)

-Mayo (you can use low fat but regular is better, because it keeps the chicken more moist when baking)

- Chicken Breast


Mix approx 1/4 cup of breadcrumbs and 1/4 cup of Parmesan cheese together. Add enough mayonnaise to make a thick workable mixture.

Place chicken breast on a 'lipped' baking sheet (so the excess fat doesnt leak onto the oven when baking). Cover chicken breast with Breadcrumb mixture.

Place in oven and cook at 350 deg F for 30 minutes (or until completely cooked)
 

CUCCOMASTER

..and all things will end
Joined
Mar 24, 2010
Location
look behind you
cucco piccata

boneless cucco breast
cut off fat and cut in half the long way.
cover with plastic wrap and tenderize with a meat tenderizing hammer on both sides
cover with flower, then dip in beated egg and cream.
after covering with egg stuff, cover in bread crumbs.
set oven to 350 degrees and cover a cookie sheet with vegetable oil.
wait for oil to heat then add breaded cucco.
cook on both sides until golden and crispy.

now prepare a lemon butter sauce.
get a frying pan and melt one stick of butter
then add the the juice of one fat lemon
then add some fresh garlic of garlic salt.
then add as many capers as you can
stirr and serve on cucco

served with rive and green beans or carrots


im trained as a chef and know that and many recipes by heart
 
Bleenchiks (Smells exactly like pancakes and eggs.)

Ingredients:
Ground Beef
Batter
Hard Boiled Egg Whites
Butter
Egg Yolk

This takes a long time to create. First, get all the ingredients prepared. Then, get a sauce pan and put a slice of butter in and spread it across the pan as it melts away. Insert the Batter across the pan and constantly watch it until it is crispy. Then, take the batter and put it on a bread-cutting-table. Get some ground beef out and hard boil some eggs. Do not cook the beef. When the eggs are complete, cut the egg up to tiny pieces. Make sure to take the you out before you start chopping to make it easier on yourself. Bring both the ingredients to the batter and place a little of each in the center. Then, wrap up the batter. Before you do so, put uncooked Egg yolk on the corners of the wrap so it stays in place after wrapped. You have a bleenchik. If you want to eat it later, put it in the refrigerator, rarely use the freezer. If you want to eat it, spread butter over another sauce pan and when complete, put the bleenchik in. They should end up being golden brown on all sides if cooked correctly. Never heat them up in a microwave! Take note that, 5 bleenchiks are one serving for one person, so you will need to make a lot. At most, you should only put 3 bleenchiks spread out in the pan when heating the bleenchik up. This is an Armenian dish. You can substitute the egg whites with rice. You can also have the beef by itself. Do not eat eggs or rice a lone. This dish has no vegetarian counterpart. Enjoy! (Blee-nh-cheeks)
 

TheGreen

is climbin' in yo windows
Joined
Jul 12, 2010
Location
San Antonio
I'm trying out pizza biscuits tonight!
I'll post pics in a bit.

edit:
PIKCHAAS!!!

action shot
PizzaBiscuits1.jpg

also in picture, roommate who mooched off my dinner making skills

Ready to eat!
PizzaBiscuits2.jpg


Teh Gurlfriend
PizzaBiscuits3.jpg


So. I was suddenly making dinner for three and with 10 biscuits I was gonna be short, so I thought I could include more toppings (and therefore more food) by turning closed pizza biscuits into open pizza biscuits.

Not super pretty, but they were super yummy! XP
 
Last edited:

February Eve

ZD District Attorney
Joined
Mar 21, 2010
Location
USA
Fun! The nice thing about them is that it doesn't really matter how they look. I tried making them with my teen program one time and everyone's tended to look more like "pizza sandwiches" than biscuits. :P But they still enjoyed the end result.

One thing I forgot to mention is that they freeze really well, too. I throw them in individual ziploc bags (after they've cooled down, or they'll melt the paper) and stick them in the freezer. Handy snack that you can heat up in the microwave later (takes less than a minute, the trick is playing around with your microwave until you figure out how long it takes to heat it through without making the dough too mush.)

I was thinking about posting an onigiri recipe, though I don't have pictures for that one. You need:

short-grain rice (a traditional sushi rice - long grain does NOT work)
chicken
soy sauce
brown sugar
corn starch
mirin (optional)

Sushi rice will often have instructions on how to cook it on the bag. The most important thing while making onigiri is to be ready to form it while the rice is still hot, so I always make the chicken first.

To make the chicken, chop it into pieces and cook it on medium-heat until it is cooked through (you may want to spray the pan with a small amount of oil.) When it is, you will make teriyaki sauce - mix equal parts brown sugar and soy sauce (like 2 tbsp soy sauce/2 tbsp brown sugar, or double, depending on how much chicken you have) and then add it to the pan. You can add corn starch to thicken it if you want; to my memory it's fine without it. You can also add a tsp of mirin if you want some extra sweetness. Once you add the teriyaki sauce, be sure to stir the chicken frequently to prevent the sugar from scorching. When it is done just take it off the heat and set it to the side until you are ready to use it again.

To make the onigiri, I use the instructions posted on Just Hungry:

Cover a small teacup with plastic wrap. Add just a touch of water and salt to it. While the rice is still hot, add about half of the amount you want to the cup, and use your fingers to create a small well in the middle. Add a couple pieces of the teriyaki chicken. Then add more rice to cover it. Pull the plastic wrap up so that your onigiri is wrapped, and shape it to your preference. (Mine are sometimes triangular, sometimes circular, depending on how stubborn the rice is.) Then put it in the fridge - it's eaten as a cold snack later. And it is traditionally wrapped in nori, though I actually prefer my onigiri plain and eat the nori by itself as a snack, because I'm weird like that.

The only problem with onigiri is it doesn't keep well in the fridge - in theory you can freeze it, though I haven't mastered the proper way to reheat it.

Here's another onigiri faq (though same author). There are lots of different fillings you can put in there - from a convenience store, the tuna/mayo was my favorite, but for homemade, teriyaki is hard to mess up, so I usually go with it. :)
 

Meego

~Dancer in the Dark~
Joined
Jan 30, 2010
Location
England
Here is a quick one for a yummy snack!

Pizza baguette

You will need:
A baguette (or a small slice)
Tomato sauce (either ketchup or dolmio type thing)
Cheese

Spread the tomato sauce on the baguette and sprinkle the cheese on top.
Grill until the cheese bubbles for a yummy and quick pizza treat!

Pasta salad
You will need:
Some pasta
Lettuce
Carrot
Tuna
Sweetcorn
Cheese

Cook the pasta
Whilst the pasta is cooking, peel and grate the carrot, wash and shred the lettuce and grate the cheese.
When the pasta is done cool it then pour it into a bowl and mix in the carrot, lettuce, cheese, tuna and sweetcorn!
Done!
 

Users who are viewing this thread

Top Bottom